Getting started
Step 1: Installation
- Total War: Rome II: Steam Workshop | Standalone (.pack)
- Total War: Attila: Workshop TBD | Standalone (.pack)
Step 2: Accessing the Interface
The interface consists of three main panels: Console, Consul, and Scriptum. You can switch between them using the tabs at the top of the ConsulScriptum window.
In Attila, the ConsulScriptum window is visible on screen by default when you load into a campaign. There is no hide/show toggle yet. You can drag it to reposition it.
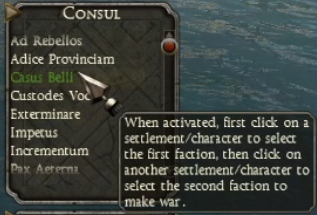
Step 3: Using Consul (One-Click Actions)
Most actions follow a simple Point and Click logic: activate a script, then select one or two targets (like a character or settlement) on the map to trigger the effect.
Usage Notes
- Highlighting: When a script is active, the entry will highlight in green.
- Toggle: Click the highlighted entry again to deactivate it.

Step 4: The Console (Commands & Lua)
Use the Console tab for manual interaction. It allows you to run slash commands or raw Lua snippets. You can also clear the output at any time to remove text from other scripts. Type /help to list all available slash-commands.
Step 5: Scriptum (File-Based Scripts)
Because the console input field is limited to short text, use the Scriptum tab for long or complex scripts. This module reads .lua files directly from your game folder.
Step 6: Writing your own scripts
If you're ready to create your own mods or automate complex tasks, move on to the Scripting Manual. It explains how the game engine works and provides code patterns you can use immediately.